You have a Windows account - you have a SkyDrive - a cloud storage where you can keep all your files and access from wherever you want and from whatever device you prefer.
If you are a Windows PC / laptop user (meaning you're x86 / amd64) you are lucky enough to have a SkyDrive desktop application for Windows which seamlessly integrates with File Explorer and you see:

But what if you're a Windows RT user? I mean Microsoft Surface, for example.
First is all you have is metro SkyDrive - an application developed especially for Microsoft Store and Windows 8. A bad side is you can not just copy a file in Windows Explorer and paste it to SkyDrive or vise versa. You have to explicitly upload and download files - that sucks. I don't understand why Microsoft Windows guys didn't include this feature to Windows RT - that's very obvious.
Second, you can't install applications directly, only from Microsoft Store.
Is it no way to integrate SkyDrive to File Explorer? A solution exists! And it is mapping your SkyDrive as a network drive.
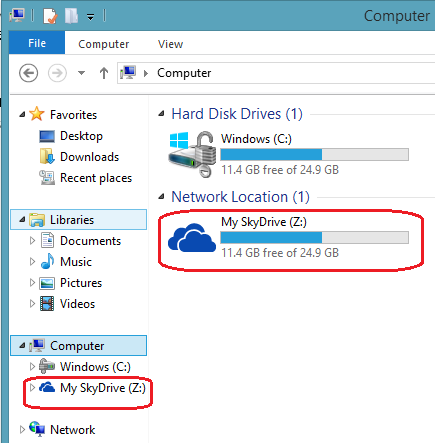
This is how it looks like on my Surface. As you may notice, the result is pretty seamless and allows you to work with your SkyDrive as it was just another hard drive or a flash drive connected to Windows.
Remember the second picture? On my Surface SkyDrive drive icon looks like from original SkyDrive desktop application, but yours has a default drive icon. Unfortunately, there is no obvious standard way to change the icon (you can't just open properties and change the icon), but fortunately there is one documented way to do this.
First of all you'll need SkyDrive icon. Then you'll need to edit Windows Registry.
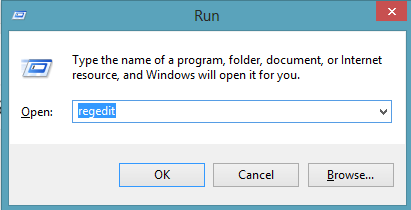
Open up Registry Editor. Hit Ctrl+Windows to open Run window, type regedit and click OK.

Close Registry Editor. Close all opened File Explorers. Open a File Explorer. You should see somewhat the same to what you can see on the second picture!
If you are a Windows PC / laptop user (meaning you're x86 / amd64) you are lucky enough to have a SkyDrive desktop application for Windows which seamlessly integrates with File Explorer and you see:
But what if you're a Windows RT user? I mean Microsoft Surface, for example.
First is all you have is metro SkyDrive - an application developed especially for Microsoft Store and Windows 8. A bad side is you can not just copy a file in Windows Explorer and paste it to SkyDrive or vise versa. You have to explicitly upload and download files - that sucks. I don't understand why Microsoft Windows guys didn't include this feature to Windows RT - that's very obvious.
Second, you can't install applications directly, only from Microsoft Store.
Is it no way to integrate SkyDrive to File Explorer? A solution exists! And it is mapping your SkyDrive as a network drive.
What SkyDrive will look like on my Microsoft Surface
We are working towards this:
This is how it looks like on my Surface. As you may notice, the result is pretty seamless and allows you to work with your SkyDrive as it was just another hard drive or a flash drive connected to Windows.
How to map a SkyDrive as a Network Drive
- Go to https://skydrive.live.com
- Enter your account name and password
- Navigate to any folder, say Documents
- Copy current URL. It should be something like
https://skydrive.live.com/#cid=XXXXX&id=XXXXX%YY
A URL can be different, but the part you need is cid=XXXXX, which should always be there. Copy XXXXX part.
- Now open up a file browser
- Right click "Computer" and choose "Map network drive..."

- Now type https://d.docs.live.net/XXXXX/ in Folder: field, where XXXXX is cid part from the step 4

Make sure Reconnect at sign-in is ticked and this drive will be remapped automatically after reboot.
Note: drive letter can be any of your choice - After clicking Finish you'll be asked for your username and password. This information is the same to what you provide when you access https://skydrive.live.com. Username is Microsoft live email address and password is the password from that email.
Note: you will have to enter email and password each time the SkyDrive gets reconnected - on every reboot. You may choose to save your credentials. If so, you will be just one click away from reconnection. - That's it - now you have your SkyDrive mapped.
- You might want to change the label for newly mapped SkyDrive, because a big hexadecimal number is probably not how you want to see your SkyDrive. That is simple. Right click just mapped drive and click Rename.
How to change a dull default icon to a neat SkyDrive icon
Now you have SkyDrive connected to your Surface and you can just drag and drop files from one place to another not thinking of any applications and where exactly an information is stored.Remember the second picture? On my Surface SkyDrive drive icon looks like from original SkyDrive desktop application, but yours has a default drive icon. Unfortunately, there is no obvious standard way to change the icon (you can't just open properties and change the icon), but fortunately there is one documented way to do this.
First of all you'll need SkyDrive icon. Then you'll need to edit Windows Registry.
Getting SkyDrive icon
- Go to https://skydrive.live.com
- Click Get SkyDrive Apps at the bottom left corner
- Choose Windows Desktop
- Click Download now button
- Choose either Save or Save As and save the file
- SkyDriveSetup.exe will be saved
Editing Windows Registry
Now, when you have an executable with SkyDrive icon, you may want your mapped drive to have this icon.Open up Registry Editor. Hit Ctrl+Windows to open Run window, type regedit and click OK.
when you are asked to allow this program to make changes to this computer by User Access Control, click Yes. Don't be afraid, nothing unchangeable is gonna happen until you're careful and don't touch what you're not sure about. Anyway, remember, we are following the Microsoft documented way.
After you click Yes you'll see the Windows Registry Editor.
-
You need to go all the way down to
HKEY_LOCAL_MACHINE\SOFTWARE\Microsoft\Windows\CurrentVersion\Explorer
- Now you need to add a new key. Right click Explorer - the last key you've opened and choose New->Key. Name it DriveIcons.
- The same way create a new key under DriveIcons. Name it with the letter you chose at step 7 from How to map a SkyDrive as a Network Drive.
- Create a sub key under drive letter key created at step 3. Name it DefaultIcon.
- Double click (Default) parameter on the right pane.
- Type the full path to SkyDriveSetup.exe into Value Data. If you opted Save at step 5 from Getting SkyDrive icon that'll be C:\Users\YourUserName\Downloads\SkyDriveSetup.exe
Close Registry Editor. Close all opened File Explorers. Open a File Explorer. You should see somewhat the same to what you can see on the second picture!
Further thoughts
You could go even further on this. You could extract the icon from SkyDriveSetup.exe and point the registry key to the icon instead of exe. To my understanding, loading an icon should be faster for Windows than opening an executable, extracting the icon and using it. And you don't have to store the executable, you simply don't need it. With that said, I won't extract the icon for you. I think it is a violation of Microsoft license. But if you'd like, you may use Microsoft Visual Studio. Just open SkyDriveSetup.exe in VS and extract the icon. There are plenty of "Resource Hackers" out there as well.
No comments:
Post a Comment